Linetypes, Text & Dimensions![]()
Last Updated: 04/01/01 02:47 PM
Week 5Review Questions (answers at end of page):
A. Name three ways of starting a command. B. Name two ways to check the area of a building plan. C. Name two ways to change an object's layer. D. What would you use Paper Space for and how would you "get there?" E. What is Associative Hatch? Let's say you have an area of your drawing that has just the right hatch pattern in it. What is the easiest way to duplicate that pattern?
Advanced Lines and objects:
Multilines:
- Menu>Draw>Multiline. or command MLINE. Two or more parallel lines as one object. Possible to modify intersections, and endcaps. Handy for quick sketches but I personally find them tedious to edit and usually try to avoid.
Construction Lines:
- Menu>Draw>Construction Line or command XLINE. Draws ray of specific angle and infinite length.
- Use command options to choose horizontal, vertical, angled, or bisected construction lines.
Polylines:
- Draws segmented line.
- Review command line options
Splines:
- Draws curved line.
More on Text:
Text Style:
- Review Style dialog box.
- Review MTEXT and difference between changing the style and changing the font within a piece of text.
Text Scaling:
- AutoCAD does not use typeset "points" like word processing or page layout programs. Instead it uses hieght in drawing units. When creating text in Paper Space it's easy to get it to print correctly: set text height to size you wish (i.e. 1/2" will print text 1/2" high. However, from Model Space you must first know the scale to which you will print the drawing and then size the text accordingly. For example, if you wish to have text print 1/2" high in a drawing that will print at 1/4" = 1'-0" scale, you would need to INCREASE the height of the text to 2'-0".
Editing Text:
- Use Properties command on Object Layer toolbar or DDEDIT command (Menu>Modify>Object>Text). Use grip edits to resize an MTEXT paragraph.
Dimensioning:
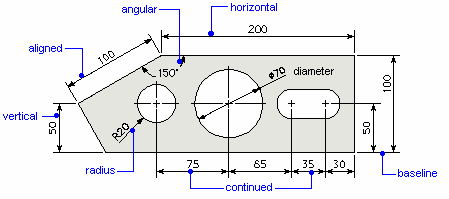
Types of dimensions:
- Review types of dimensions and how they would be used.
Creating Dimension Styles:
- AutoCAD places dimensions on the current layer. Every dimension assumes the current dimension style, which controls characteristics such as arrowhead style, text location, and lateral tolerances. With dimension style families (groups of dimension styles), you can make subtle modifications to a base dimension style for different types of dimensions. With dimension style overrides, you can modify these characteristics for a specific dimension.
- Review Dimension Style dialog box. Design sample dimension style.
- Review Geometry, Format, and Annotation
- Experiment with styles.
Creating dimensions:
- In Paper Space
- Dimension associativity and tolerance.
- Choosing the correct dimension tool.
- Drawing on the correct layer.
Dimensioning in Paper Space:
- Using OSNAPS
- DIMLFAC system variable. Scaling to Paper Space viewport.
Modifying:
- Properties command, editing format and content.
![]()
Review Question Answers:
A. Name three ways of starting a command:
- Menu at top of AutoCAD window (File, Edit, View, Insert, etc...)
- Toolbar buttons.
- Command Line. Here you have to type the name of the command exactly or type a keyboard shortcut such as "L" for "LINE". Shortcuts are customizable and many experienced AutoCAD users take advantage of that.
B. Name two ways to check the area of a building plan:
- Draw polyline, list its properties: Draw a polyline (PLINE command or Draw toolbar) around area to be checked. Be sure the pline is closed by either typing a "C" instead of the last mouse-click or by PEDITing the polyline and typing "C" for close. Next, LIST (Inquiry toolbar) the properties of the newly created PLINE. At the end of the information that displays you should see the area listed in the current drawing units (hint: if the area listed is not in the units you were expected you are not drawing in the units you thought you were...)
- AREA command: Use AREA command (Inquiry toolbar) and click points around the perimeter of the area in question. The command returns the area enclosed by your clicks in the current units. See hint above.
C. Name two ways to change an object's layer:
- Properties Command: Start Properties command, select object in question, pick "Layer..." option and then chose the layer to which you wish to change. Click OK until you're done. This process works for single objects at a time.
- Click object, change layer in Layer Control window: Without starting a command, click on the obect in question--object should highlight and most likely "grips" should appear at corners. Next, on Object Properties toolbar (if not open, use Menu>View>Toolbars... to open it) notice that the dispaly changes from the current layer to the layer of the object on which you just clicked (if different...). To change the layer, click on the Layer Control window which causes it to "drop-down" with a display of all the layers currently in your drawing (and not filtered out!). Choose the layer you want. You're done.
D. What would you use Paper Space for and how would you "get there?"
- Paper Space is useful for displaying your model for printing. It allows you to open "viewports" into Model Space where your drawing usually resides. By scaling the viewports as needed, you can organize a sheet of drawings at different scales and views while keeping you model simple and clean. Also, you can add text and dimensions in Paper Space that will float over the Model Space viewport below. To "get there" double-click on the "TILE" button on the status bar at the bottom of the AutoCAD window (looks like: SNAP, GRID, ORTHO, OSNAP, MODEL, TILE). If you can't see it, try maximizing the AutoCAD window. You can also "get there" by setting the system variable TILEMODE to 0, which is what the button-clicking described earlier is doing for you.
E. What is Associative Hatch? Let's say you have an area of your drawing that has just the right hatch pattern in it. What is the easiest way to duplicate that pattern?
- Associative Hatch is a fill pattern that automatically updates when its boundary changes. If associativity is removed from the hatch, the fill pattern will not update. Once removed, associativity cannot be restored.
- Inherit Properties in the Boundary Hatch dialog box. This option allows you to select a hatch pattern that you wish to match and then imports the fill patterns to the current settings.
![]()
Reading: Frey, Skill 9 (we'll come back to Skill 8)