Updated to Snow Leopard.
Some of the issues below, though written under earlier versions of OS X, still apply to Snow Leopard.
Using Mac OS 10.5 Leopard with X11 and fink
Mac OS X Leopard update
Think about it. One hundred poodles are scarier than one leopard. That's assuming, of course, that the leopard has no legs.Ellen DeGeneres
Leopard's new X11
Leopard (Mac OS X version 10.5.x) is assumed here. For old notes pertaining to pre-Leopard Mac OS X, see here. That page also contains important survival tips that still apply to Leopard.
The starting point for these notes is an Intel Mac on which you have just upgraded from the Tiger operating system to Leopard. This page addresses the question of how to get X11 and other UNIX software running under Leopard.
Install X11
If you're buying or upgrading to a Mac with Leopard version 10.5.3 or above there should be no problem with Apple's X11. Problems with X11 may arise if you installed Leopard versions below 10.5.3.
As a replacement for the faulty X11 that came with those earlier installations, you may have obtained the latest "fixed" version (X11 2.2.3 or above) available from Mac OS Forge. You would install this over an already existing Apple X11. However, Apple's Software Update may in turn potentially overwrite (or damage) a Mac OS Forge installation of X11 if the update downloads System software. If that happens, you have to re-install X11 from that web site after running System Update (so keep the Disk Image). For this reason, and also because the 10.5.4 update fixes several other bugs, it is now perfectly OK to stick with Apple's X11 which is also updated through Software Update.
In order to customize X11 beyond the options exposed in the menu bar, have a look at man Xquartz.
What if you already have Mac OS Forge installation of X11 but want to go back to Apple's X11?
To avoid having to manually re-install your Mac OS Forge X11 after system software updates on Leopard 10.5.3 or above, you can revert to Apple's X11. How you do that depends on the Leopard version on your installation disk. For the most up-to-date instructions, look at the wiki. Here is what I did (on Lepard): start by installing the X11 and X11 SDK packages from that disk. If the disk has Leopard 10.5.0, you can get back to 10.5.4 (the current version as of this writing) by downloading and installing the Mac OS X 10.5.4 Combo Update. After that, perform a Software Update.
For Snow Leopard, I was forced to go back to XDarwin from MacOSForge because Apple's stock X11 had a window focus bug: Switching between X11 windows by using Apple's keyboard shortcut (Command-`) froze the X11 interface (unless you check "Enable key equivalents" in the X11 preferences, which wasn't an option I wanted). So I now use the most recent beta version of XDarwin. One can set automatic updes for these beta relases as described here.
Install XCode 3
XCode is a development environment that provides (among many other things) the C++ compiler that will be used below to compile most of the open-source software that is available for the Mac. To get the most up-to-date version, it's best to check the Apple website, and look for XCode under "Development Tools". There are also additional compilers available for download as "XCode Legacy Tools". These encompass older versions of gcc which may be needed to compile some older software.
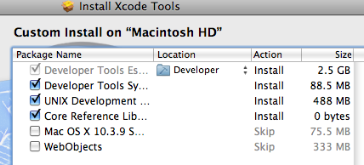
During the XCode installation for OS versions below 10.3, don't overlook the X11 SDK package, which is needed if you want to compile programs that rely on X11 headers. This is the case for the ghostscript fink package that I maintain. In order to get the XCode Installer to provide this and other added material, make sure to click Customize to get to the window shown here:
Alternatively, you can also find the X11 SDK in the "Packages" folder on the XCode disk image. With OS X version 10.3, you won't have to worry about this anymore because the SDK is installed by default.
Although I have not been afflicted with it, others have reported a mysterious issue where - despite a seemingly successful installation - the required header files are not actually installed.
To get an idea whether you have the development headers, type
ls /usr/X11/include/fontconfig/ and verify that this outputs three files.
If none of the above preseciptions give the desired result, it may be necessary to reinstall X11SDK.pkg after zapping the installer's "memory"
as described here. Basically, you exectute the command
sudo pkgutil --forget com.apple.pkg.X11SDKLeo
and perhaps some additional ones.
This should be enough to convince the system that you don't have that package yet (it's removed from /Library/Receipts), so it will really be reinstalled (this command works only on Leopard, not on Tiger). If you're having trouble with other installed packages and want to do the same thing, taking a look at /Library/Receipts/bom may help you identify the suspect.
Finally, it may also be possible to fix the installation by following the uninstall instructions in the "About" document accompanying the XCode installer, and then starting the installation from scratch.
 "Leopard Seal of Approval" |
X11 Preferences
If you find at some point more than one X11 icon appearing in your Dock, this probably means you're setting the DISPLAY variable in some initialization file. This information is now done automatically whenever a program tries to open X11 (via launchd), so you should not set the DISPLAY variable explicitly.
In Leopard's version of X11, there is a new Preference Click-through which I enable, together with Emulate three-button mouse (the other two menu items remain disabled).
If you're using The Gimp or Inkscape the X11 is crucial to have, and an important issue is the integration between the clipboards of Aqua and your X window manager.
While some projects such as Gimp have already been equipped with this functionality under the older X11 versions (you can paste images into Gimp that have been copied into the Aqua pasteboard), others such as Inkscape can't handle pasting from the Aqua pasteboard yet, even with the new XQuartz.
If you are having problems pasting into one of these applications, there is a setting in the X11 Preferences (XQuartz 2.3.5) that you may have to change (Inkscape may now automatically do this for you): under Pasteboard, un-check the option "Update Pasteboard when CLIPBOARD changes".
To make multi-windows programs such as Gimp more useable under X11, you may also want the focus to automatically jump to the window the mouse is hovering over. This "focus follows mouse" behavior is obtained by setting
defaults write org.x.x11 wm_ffm -bool true.
You need to re-launch X11 for this change to become effective (under Tiger, the same thing is achieved with defaults write com.apple.x11 wm_ffm -bool true).
Integrating X11 and Mac OS X
In xemacs, gimp and other applications, you may find that the X11 font sizes don't match those of the OS X fonts. To fix this, you have to change the variable defaultserverargs="" in /usr/X11/bin/startx to defaultserverargs="-dpi 96". This is not needed under Tiger (where the corresponding file is located in /usr/X11R6/bin/startx).
More and more X11 programs (e.g., gimp) allow you to exchange not just text but also graphics back and forth with the OS X pasteboard. What if you want to write your own script such that it places a PDF image on the pasteboard? The command pbcopy does this for text, but not reliably for graphics. In particular, for PDF format there is no way around writing a handmade tool. Here is an example that illustrates how to do this: if the image is called /Users/noeckel/plot.pdf, you get it onto the pasteboard by typing the Terminal command line
osascript -e 'set the clipboard to (the POSIX file "/Users/noeckel/plot.pdf")'
To launch X11 programs, one usually types their name from a Terminal command line, e.g., xemacs& (where the ampersand launches the application as a job and immediately returns control to the command line). Instead of this, one can easily wrap this execution shell statement in an AppleScript or other Mac-native interface, and thus create a double-clickable application using the shell executable.
To make such Droplet Applications, there are XDroplet Factory and Platypus. I highly recomment Platypus as a flexible but simple framework for wrapping scripts. For very simple scripts on Leopard, I've adopted a do-it-yourself approach. An example of how to make your own droplet using Applescript is given on a separate page.
Permissions and "Applications downloaded from internet"
If you have more than one user on the system, there is an annoying side effect for Applications downloaded by one (admin) user when opened by another account: the other user will have only read access and this seems to trigger a security warning asking you to confirm that you want to run this "Applications downloaded from internet". This warning re-appears everytime you open the Application, unless you log in as an admin and set the privileges for that Application to Reaad & Write for the affected account.
Changing default shell
To change the default terminal shell for a user, right-click (after you've enabled that right mouse button) on the user's icon in the Accounts system preference pane, and choose Advanced. This replaces the NetInfo Manager
Utility from earlier OS X versions.
Middle mouse button
This is not specific to Leopard, as it relates to X11 and the middle-mouse button: if you have a three-button mouse and the middle mouse button pops up the Application Picker (the Dashboard-like icon list you also get with CMD-Tab), then you should change the function of Button 3 to what X11 expects it to be: Button 3. One would assume that this can be changed in the System Preferences, but you may be unable to locate the corresponding panel if the mouse you're using is from a third party: I haven't had this problem with Kensington (its driver software allows full customization), but with Logitech and Wacom mice. For the latter, the middle-mouse configuration only shows up in Mouse Preferences when you plug in an Apple Mighty Mouse. Fortunately, once the setting is changed for the Mighty Mouse, it also works for other three-button mice. Of course, don't forget to also change the right-mouse button away from its default setting (which is: to do the same as the left button).
Jens Nöckel Last modified: Sun Apr 25 11:06:13 PDT 2010