Jens Nöckel's Homepage

Computer notes home

Transparency in bitmap graphics

It's ironic: with Quartz, the Mac user interface offers a high-quality vector oriented (PDF) graphics system, but I still find myself using ancient techniques for tasks that don't involve vector graphics, i.e., for manipulation of bitmaps. Do we really need bitmap graphics? The answer is yes for several reasons. One is described on another page addressing graphics size issues; another reason is that sometimes your original graphic comes as a bitmap. That's not just true for photos (probably the most common application, this is the reason for the "Photo" in "Photoshop"), but also for many types of numerical simulations.

Keynote, Pages

While iPhoto has many nice features for processing photos, it is certainly not a Photoshop replacement. In fact, many of the neat tricks that one can play with bitmaps are based on the ability to make parts of an image transparent. The new Keynote '08 (and similarly the companion product, Pages) has added this feature in the form of an "Alpha" tool that makes creating transparent backgrounds very easy. Here is a screenshot of the tool in action:

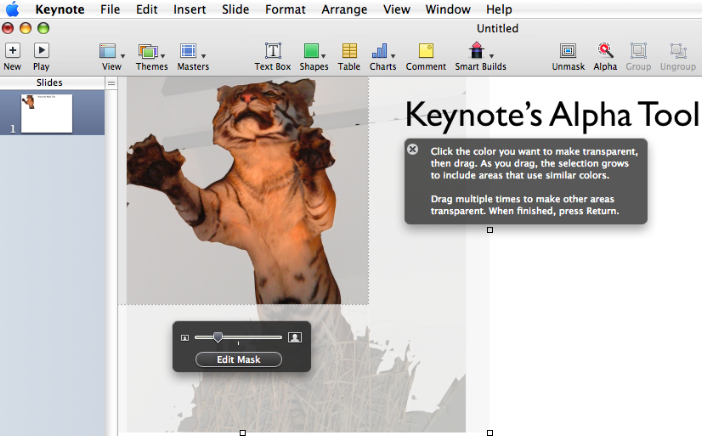
In this example, the combination of masking and Alpha effect allows to make the background behind the tiger disappear. It takes a bit of experimentation to achieve the desired appearance, but this is definitely a slick and simple way of getting bitmaps to behave "transparently". The only problem is: exporting the result as a transparent image for use in other applications doesn't seem to be possible. So with Keynote, I can't leverage the fruits of my labor for a web page, where transparent GIF or PNG images are often desirable.

Because of this, I'm led to the question: can we do the same kind of thing outside of Keynote to retain more flexibility for later use? With the new Leopard operating system, the answer to this question will be: Preview.app (using pretty much the same functionality as described here). But if you don't want to install Leopard, here are some alternatives.

There is a powerful command-line way of putting transparency into bitmaps, using Imagemagick's convert utility. This is used, e.g., by text4ht, a latex-to-html converter (among other things). In the following, I'll describe how to do similar things in freely available image editors, using screenshots because it's hard to describe in words how to navigate through a graphical user interface.

Gimp

The Gimp has a Fuzzy selection tool that you use pretty much the same way as described above for Keynote. However, the Gimp requires some additional steps: first enable an alpha channel, then make your selection, and finally cut the selected area. I may write more about how to use Gimp at some point. If you have X11 and 340 MB of disk space, Gimp is really the best solution for bitmap manipulation. Recent versions even have a special Edit menu item allowing you to copy and paste images from the Mac clipboard (something that isn't straightforward because the X11 clipboard is originally not integrated with the Aqua one). So as of this writing, Gimp is really quite well integrated with Mac OS X, despite its X11 interface.

Seashore

On a separate page, I mention Seashore as a free bitmap drawing and manipulation program, based on the Gimp. There isn't much easily accessible documentation for Seashore per se, so I'm writing down some things here that may not be so obvious. The focus is on handling transparency. Here are two approaches that work in Seashore:

Letting the image be its own mask

The manual procedure outlined here is just the bare minimum needed for creating a transparent background. To be more sophisticated, is up to you. In Seashore, we want to make the background of the following image transparent:


This isn't so easy because my son created it in pencil on grid paper, and since it's been scanned in the background isn't completely white. He tried to write like a computer here, which is fitting for this example. The general idea is as follows:

  1. Make sure transparency (the "Alpha Channel") is enabled in your picture, as shown in the screenshot:

  2. Choose Select all from the menu and copy the image.
  3. With the image copied to the clipboard, go to the Layers palette and set it to display only the Alpha Channel:
  4. Paste the image. It will be in a "floating layer" for now. You could anchor it to the Alpha channel now, but we'll do that later.
  5. The image that will determine the transparency in the Alpha channel should be black wherever the picture is to be transparent. So we simply invert the colors in this example, since our grid paper happens to be white:

    The result looks like this:
  6. Now we anchor the floating selection with our inverted image to the Alpha Channel:

If you set the Layers selector to display "All" again, the image should look pretty much like the original we started with, because the presence of the Alpha Channel is only noticeable if we now put the image onto a different background (the background color should shine through). To verify this, the final result can now be exported as .png, one of the common formats that support transparency. Don't use .gif, it seems Seashore doesn't handle GIF transparency correctly.

Just for fun, here is another example obtained with a similar procedure:

With this tiger, I needed to convert a copy to grayscale first,

I cleaned up the background with a few paintbruch strokes, adjusted brightness, contrast and threshold to make the tiger black, and then inverted this before putting it into the Alpha channel:

The result is a tiger without background:

In conclusion, we can do what Keynote '08 can do. The advantage is that we can now do with the image what we want: paste it into Keynote, or put it in a web page, etc.

Cutting out pieces

Beyond the above example, the main idea in getting transparency to work is always: create an Alpha Channel and provide it with a grayscale image that is black wherever you want the background to shine through. This can be achieved in many ways, depending on the image under consideration. For example, in some cases it can be advantageous to simply use the lasso tool to cut out part of your image, paste it into a new graphic and work with that. With that approach, you may end up with the simpler problem of making a homogeneous, background region transparent.

Even if the background isn't completely homogeneous, we can make it transparent using the "color selection tool" (or magic wand) in the tool bar. It selects regions with the color you click on, within a tolerance you specify in the "options" utility window. To select regions that are not connected, you can check the "Add" mode in that same options palette.

When all desired regions are selected, copy them and paste them as a float above the alpha layer. Now manipulate the colors so that the selected regions become black (using items from "Selection>Effects>...") . Anchor this to the Alpha layer, and the result should have the transparent background when saved as PNG.

The Window menu item "Utility Window > Transparent Color" lets you choose a color that is displayed as background wherever the image has transparency. This window should therefore more properly be called "Custom Background Color", it won't be visible outside of Seashore once you save the image. For example, in the above tiger picture, if I choose red as the "transparent color", all that happens is that the parts shown as white in the background will be colored red.

Seashore is something like a "light" version of the Gimp, so if you want more features and documentation, you should look at that program instead. Here is a link that may help go further with the topic at hand.


noeckel@uoregon.edu
Last modified: Sun Jun 29 23:44:50 PDT 2008