Utility Tools and Interface Customization
Last Updated: 05/20/01 10:09 PM
Week 5: Exercise #2 due on Tuesday.
Keyboard Shortcut Customization
Any command can have a keyboard shortcut associated with it. For example, "L" for LINE and "C" for CIRCLE to start your favorite commands. These shortcuts are controlled by a text file stored in the "Support" directory of the default AutoCAD installation. Create your own keyboard shortcuts by modifying theĀacad.pgp file. You can use any standard text editor to edit the acad.pgp file. Notepad is a simple text editor that works well for this task: You can open Notepad.exe by going to
>Programs>Accessories>
. From Notepad open
.
Or from the command prompt in AutoCAD, type "SHELL" followed by return, followed by "NOTEPAD.EXE".
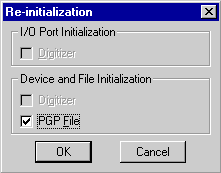
After you make your changes, use the REINIT command to make those changes take effect by typing "REINIT" at the command prompt. Once the reinit dialog box pops up, check the "PGP file" box and click "OK". Below is a partial example of one version of a PGP file. You can customize the file to meet your needs. Many people who work on various machines take their PGP file with them when the change machines. Typically, the best way to use your own file is to RENAME the existing PGP file to something like "acad-pgp.old" and then copy your version to the same directory. Use the REINIT command if AutoCAD is running to force it to use the new file.
The format is "X, *Y" where X is the keyboard shortcut (not case sensitive) and Y is the exact command name as it would be typed at the command prompt. It doesn't matter how many spaces you type between the comma and the asterisk, but lining up with adjacent commands helps future editing. For example: A, *ARC
AR, *ARRAY
B, *BREAK
BH, *BHATCH
CC, *CIRCLE
C, *COPY
CH, *CHPROP
CHM, *CHAMFER
D, *DIST
DE, *DDEDIT
DI, *DDINSERT
DIV, *DIVIDE
DO, *DONUT
DR, *DDRMODES
DT, *DTEXT
DV, *DVIEW
E, *ERASE
EX, *EXPLODE
EL, *ELLIPSE
F, *FILLETToolbar Customization
You can change the size of toolbar buttons and reposition, add, or delete toolbar buttons. You can also change the toolbar name and turn tooltips on and off.
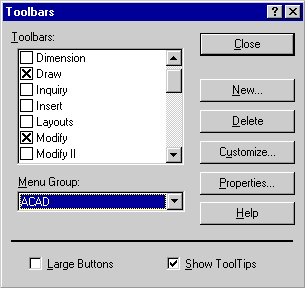
- From the View menu, choose Toolbars.
- If the toolbar you want to modify is not displayed, select it in the Toolbars dialog box.
- Choose Customize.
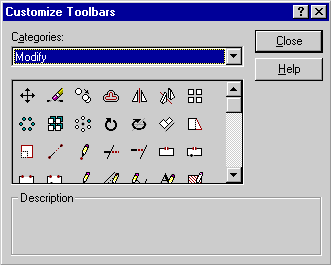
- While the Customize Toolbars dialog box is displayed, you can modify any displayed toolbar as follows:
- Drag toolbar buttons right or left to reposition them.
- Create spaces by dragging a button to the right or left edge of the button beside it, but not past the middle.
- Remove toolbar buttons by dragging them off the toolbar.
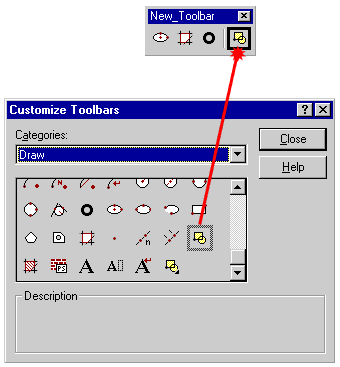
- Add buttons to toolbars by dragging them from the Customize Toolbars dialog box to the toolbar. Change the Categories selection to display the buttons you want to add.
- Drag buttons from one toolbar to another, or press CTRL while you drag to copy the toolbar button to another toolbar.
- Choose Close to exit the dialog boxes.
To Create a New Toolbar
- Right-click any toolbar to display the shortcut menu, then click Customize.Ā
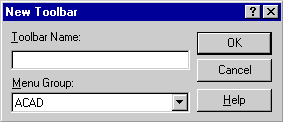
- In the Toolbars dialog box, click New to display the New Toolbar dialog box.Ā
- In the Toolbar Name box, type the name you wish.Ā
- Click OK to create the new toolbar and return to the Toolbars dialog box.Ā
Adding Tools to a New Toolbar
- In the Toolbars dialog box, click Customize to display the Customize Toolbars dialog box.Ā
- In the Categories list, select Modify to select tools from the Modify toolbar.Ā
- In the icon list, select the a command icon to view its description.Ā
- Drag the icon from the list to your newly named toolbar. The toolbar resizes to fit the added tools.
Creating a New Tool for a New Toolbar
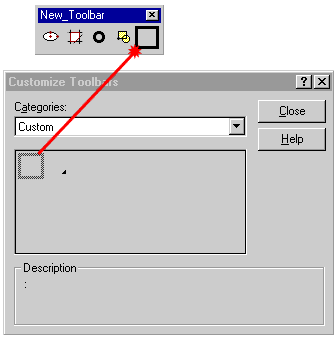
- In the Customize Toolbars dialog box, in the Categories list, select Custom to use a blank icon for your new tool.Ā
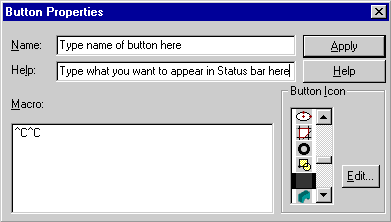
- Drag the blank icon to your new Edit Tools toolbar, then right-click the blank icon to display the Button Properties dialog box.
- In the Name box, type the name of the new button. This text appears as a tooltip when the pointer passes over the tool.
- In the Help box, type offset objects 5 units from the original. This text appears on the status bar when the pointer passes over the tool.Ā
- In the Macro box, type ^C^C, and then the text for the tool macro text.Ā The "^C^C" canels any commands already started. For example the Macro string "^C^C_ellipse _c " would start the ELLIPSE command with the center option selected. NOTE the space after the last c. Spaces and semi-colons act as carriage returns in the macro. If you leave them out, you will find yourself hung in the middle of the command. Try looking at the macros associated with various tools to see how they work. Click here for a list of command syntax.
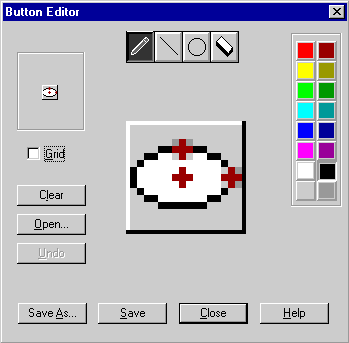
- Click Edit to design your own icon in the Button Editor dialog box.Ā
- Draw what you want for the button bitmap to illustrate the concept of the command.Ā
- Click Close, then click Yes to save the button bitmap.Ā
- In the Button Properties dialog box, click Apply to apply the properties to the new Offset 5 Units tool.Ā
- Close all the open dialog boxes.
Drawing Maintenance
Purging Unwanted Information from the Drawing Database
AutoCAD drawing files contain both graphical and nongraphical objects. You use graphical objects, such as lines, arcs, and circles, to create your designs. At the same time, you use nongraphical information, called named objects, to manage the design. Named objects include such items as text styles, dimension styles, named layers, and named views. Named objects help you design more efficiently. For example, if you use a set of linetype properties frequently, you can save the properties as a named linetype and then apply the linetype to lines in your drawing at any later time.
You can define and save different ways to view a drawing. For example, you can save multiple UCSs (user coordinate system), so you can easily switch from one UCS to another during a drawing session. You can also save multiple views and viewport configurations.
AutoCAD stores named objects in symbol tables and data dictionaries. Each kind of named object has a symbol table, or a dictionary, and each table or dictionary can store multiple named objects. For example, if you create 10 dimension styles, your drawing's dimension style symbol table will have 10 dimension style records. However, unless you create LISP routines or program AutoCAD, you do not work with symbol tables or dictionaries directly. You can view and revise all named objects using AutoCAD dialog boxes or the command line.Over time, drawings may accumulate many named objects that are no longer needed. For example, you may have a text style that is no longer used by any drawing text, or a layer that contains no drawing objects.
Purging named objects reduces drawing size. You can purge individual named objects, all styles and definitions of a specific type, or all named objects in a drawing. Keep in mind, however, that you cannot purge named objects that are referenced by drawing objects. For example, you cannot purge a linetype used by a line in your drawing.
Purging removes only one level. For example, if purging a layer removes the only reference to a linetype, the linetype is not purged until you purge again using the Linetype option.
To purge unused named objects
- From the File menu, choose Drawing Utilities Purge.
- Choose an object type to purge, or choose All to purge all unused named objects.
AutoCAD prompts you with the name of each unused named object of the specified type.
- Enter the named object to be purged or enter an asterisk (*) for All.
- Enter y or n to verify each name to be purged. If you answer y, AutoCAD displays the named object's symbol table reference and name.
- Enter y or n in response to each prompt. The command ends when AutoCAD finds no unused named objects.
For Example: File menu: Drawing Utilities Purge
Command line: purge
Enter type of unused objects to purge [Blocks/Dimstyles/LAyers/LTypes/Plotstyles/SHapes/textSTyles/Mlinestyles/All]: Select an object type to purge or enter a to purge all named object types
After you specify the type of named objects to purge, AutoCAD prompts:
Enter name(s) to purge <*>: Enter a name or names, or press ENTER to purge all objects
Each named object to purge is displayed for verification.
PURGE removes only one level of reference. Repeat PURGE until there are no unreferenced objects. You can use PURGE at any time during a drawing session.
AUDIT
AutoCAD can be abnormally terminated because of a power failure, a program error, a Windows Program Manager failure, or because you restarted your computer before exiting AutoCAD.
To minimize data loss in case of a system failure, use the Automatic Save preference on the General tab. AutoCAD makes a backup copy of the file at the interval that you specify. If AutoCAD or another Windows application fails and reports an application error message, restart Windows before restarting AutoCAD.
If you're concerned about data corruption, use AUDIT to check drawing integrity. Use RECOVER to recover a damaged drawing.AUDIT is a diagnostic tool for examining the current drawing and correcting errors. For every error detected, AutoCAD provides a description of the error and recommends corrective action.
File menu: Drawing Utilities Audit
Command line: audit
Fix any errors detected? [Yes/No] <N>: Enter y or n, or press ENTER
For easy access, AUDIT places all objects for which it reports errors in the Previous selection set. However, editing commands affect only the objects that belong to the current paper space or model space.
If you set the AUDITCTL system variable to 1, AUDIT creates an ASCII file describing problems and the action taken and places this report in the same directory as the current drawing, with the file extension .adt.
If a drawing contains errors that AUDIT cannot fix, use RECOVER to retrieve the drawing and correct its errors.
Revisit Dimension Styles
See Review Week 5 from Basic CAD class for additional information on Dimension Styles.
![]()
Assignment: Review Exercise 3, due at beginning of class, Week 7
